If your ceiling fan is not functioning correctly, you may be wondering how to replace a ceiling fan capacitor yourself.
Replacing a ceiling fan capacitor can seem daunting, but with the right tools and guidance, you can do it easily. This article will walk you through the steps you need to take, answer some common questions, and provide you with useful tips along the way.
What is a Ceiling Fan Capacitor?
A ceiling fan capacitor is a small electrical component vital to the operation of your fan.
Functions of a Ceiling Fan Capacitor:
- Helps to start the fan
- Regulates the speed of the motor
- Acts as a component in the fan’s electrical circuit
When a capacitor fails, you may notice the fan running slowly, humming, or not running at all. Knowing how to replace a ceiling fan capacitor can save you both time and money.
How Do I Know if My Ceiling Fan Capacitor is Bad?
Before you rush to replace your capacitor, it’s essential to diagnose the problem:
Signs of a Bad Ceiling Fan Capacitor:
- Fan Won’t Start: The fan may not respond when you flip the switch.
- Unusual Noises: You may hear a humming or buzzing sound from the fan motor.
- Inconsistent Speed: The fan wobbles or operates at an inconsistent speed.
- Limited Functionality: The fan has features that don’t work anymore, like reversing direction.
If you observe these signs, it might be time to learn how to replace a ceiling fan capacitor.
What Tools Do I Need to Replace a Ceiling Fan Capacitor?
Gathering the right tools will make the process smoother. You will need:
- Screwdriver (Flathead and Phillips)
- Multimeter (to test electrical components)
- Replacement Capacitor (ensure it matches your fan’s specifications)
- Electrical Tape
- Wire Cutters/Strippers
Having all your tools ready before starting will help you avoid unnecessary interruptions.
Can I Replace a Ceiling Fan Capacitor Myself?
Absolutely!
Here’s a simplified step-by-step guide on how to replace a ceiling fan capacitor yourself:
Step 1: Turn Off the Power
Before you start any electrical work, safety is crucial.
- Turn off the power to the ceiling fan at the circuit breaker.
- Use a non-contact voltage tester to ensure there is no electricity flowing to the fan.
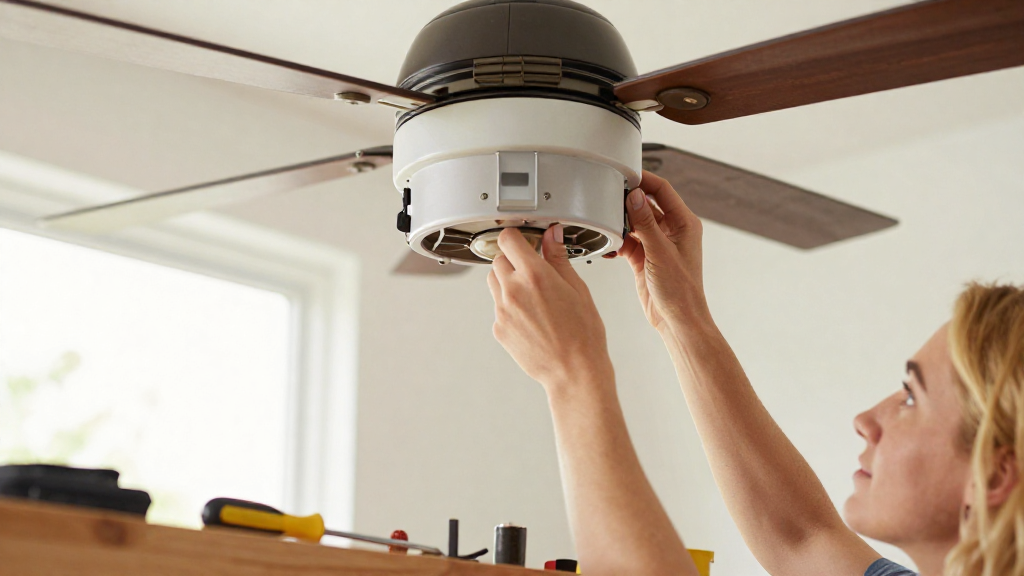
Step 2: Remove the Fan Blades and Canopy
- Take off the fan blades – Removing them makes it easier to access the electrical components.
- Unscrew and remove the canopy (the decorative cover that houses the motor) to expose the wiring and capacitor.
Step 3: Locate the Capacitor
Once the canopy is removed, you’ll see different wires.
- Find the capacitor – Typically a small, cylindrical or rectangular component attached directly to the fan’s motor.
- Take a picture or note the connections – This will help you remember how to connect the new capacitor.
Step 4: Disconnect the Bad Capacitor
- Carefully disconnect the wires attached to the old capacitor.
- Take your time – Make sure you remember where each wire connects.
- Use your multimeter to test the capacitor to confirm it is faulty.
Step 5: Install the New Capacitor
- Connect the new capacitor according to the notes or photos you took earlier.
- Ensure all connections are tight to prevent future problems.
Step 6: Reassemble the Fan
- Carefully replace the canopy and screw it back into place.
- Reattach the fan blades securely.
Step 7: Turn on the Power
- Go back to the circuit breaker and turn the power back on.
- Test the fan – Make sure it runs smoothly and that all features work.
What Should I Consider When Buying a Replacement Capacitor?
When purchasing a replacement capacitor, keep in mind:
- Match Specifications: Ensure the voltage and microfarad ratings match your ceiling fan.
- Purchase from Reputable Brands: Go for well-known manufacturers to ensure quality.
- Read Reviews: Check customer feedback before making your purchase.
By doing some research, you can find a reliable replacement that will restore your fan’s functionality.
How Long Does It Take to Replace a Ceiling Fan Capacitor?
Replacing a ceiling fan capacitor typically takes about 30 minutes to an hour depending on your skill level.
Taking the necessary precautions and being thorough in the process will ensure a safe and successful replacement.
When Should I Call a Professional Electrician?
Sometimes, the best course of action is to seek professional help. You may need to call a licensed electrician if:
- You’re not comfortable working with electrical components.
- You have multiple ceiling fans showing similar issues.
- The fan shows signs of more extensive damage beyond just the capacitor.
Conclusion
Knowing how to replace a ceiling fan capacitor is a valuable skill that can save you time and money, enhancing your DIY repertoire.
By following the steps outlined in this guide, you can restore functionality to your ceiling fan efficiently.
Always prioritize safety by turning off power and using the right tools.
If any complications arise during the process, don’t hesitate to consult a professional.
With the right knowledge and approach, you can confidently tackle this project and enjoy a fully operational ceiling fan once again!